
One photo rarely causes a problem with memory space. A few thousand — that’s a different story.
Large files can also be troublesome in everyday situations: the submission form accepts attachments no larger than 2 MB, sending messages takes too long, or the site rejects a photo in HEIC format. In each of these cases, the request to «reduce the photo» means something slightly different.
This guide shows how to reduce the size of a photo on an iPhone in five practical ways. The choice depends on whether you need a smaller file for sending, photos of the same width in pixels, or more free space in your library.
How to check the size of a photo and understand the given values
Open the image in the Photos app, then swipe up or tap the info button. In the details panel, you will see the photo format, its dimensions in pixels, and the file size.
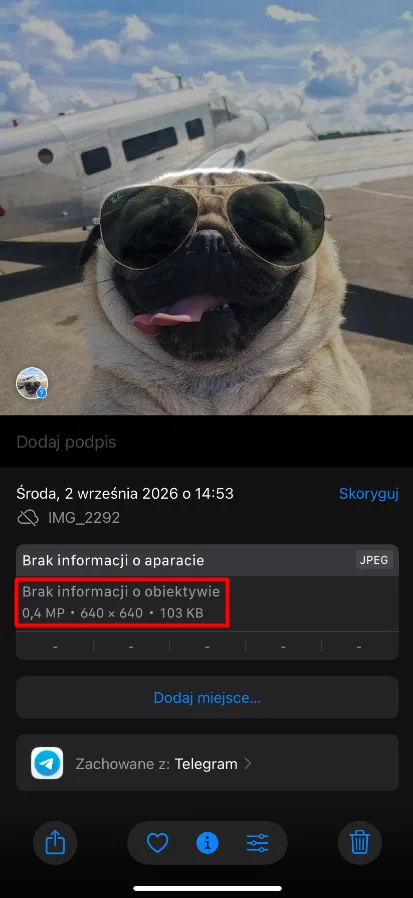
In this screenshot, JPEG indicates the format, 640 × 640 are the dimensions in pixels, and 103 KB is the file size. When comparing to the attachment limit or uploaded file, refer to the value expressed in KB or MB.
Dimensions define the width and height of the image. Reducing them removes some pixels, which usually allows for a smaller file. However, there are fewer details left that can be used for later cropping or printing the photo.
The file size also depends on the format and compression. Two images of identical dimensions can take up different amounts of space. Changing the format from HEIC to JPEG may improve compatibility with an app or website, but it doesn’t necessarily reduce the file size.
The occupied space in memory is another matter: it concerns the total space used by the photo library. Creating a smaller copy makes it easier to upload the image, but keeping both versions takes up more space on the phone.
If the photo is in the Files app, tap and hold it, then select Get Info. Also, pay attention to the extension. Even a small HEIC file may require a JPEG copy if the destination does not support HEIC.
How to reduce photo size on iPhone: five methods
Method 1: Use a compression app
If you prefer to compress a photo on your iPhone using an app, one option is the Clever Cleaner app for iPhone. It helps manage your library: it finds duplicates, removes unnecessary files, and compresses photos and videos you want to keep.
The available compression of multiple images at once allows you to select several images, choose the compression level, and check the expected size reduction before starting. This way, you don’t have to process each image individually.
- Open Clever Cleaner or install the app if you don’t have it yet. Allow access to the photos you want to compress.
- Tap Compress to open the multimedia compression screen.
- Select Photos and check several images you want to process together.
- Open the compression settings for the selected images.
- Start with the Optimal setting. Medium and Max are also available. Before applying stronger compression to a large group of images, test it on a small sample.
- Check the expected size reduction visible under the compression options.
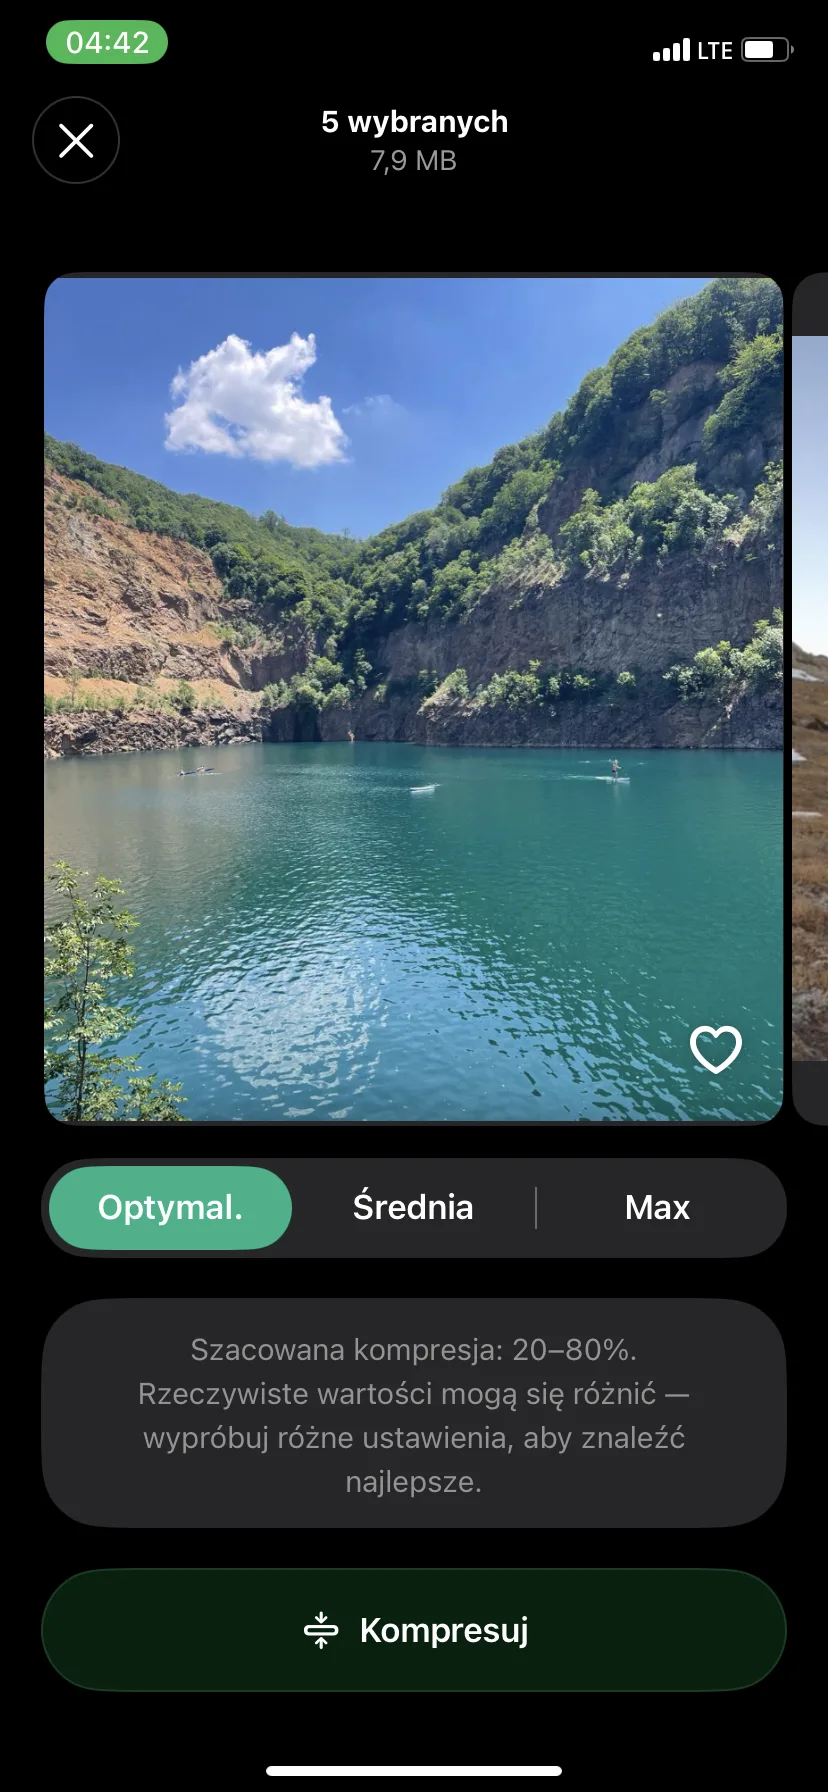
- Tap Compress and wait for the processing to finish.
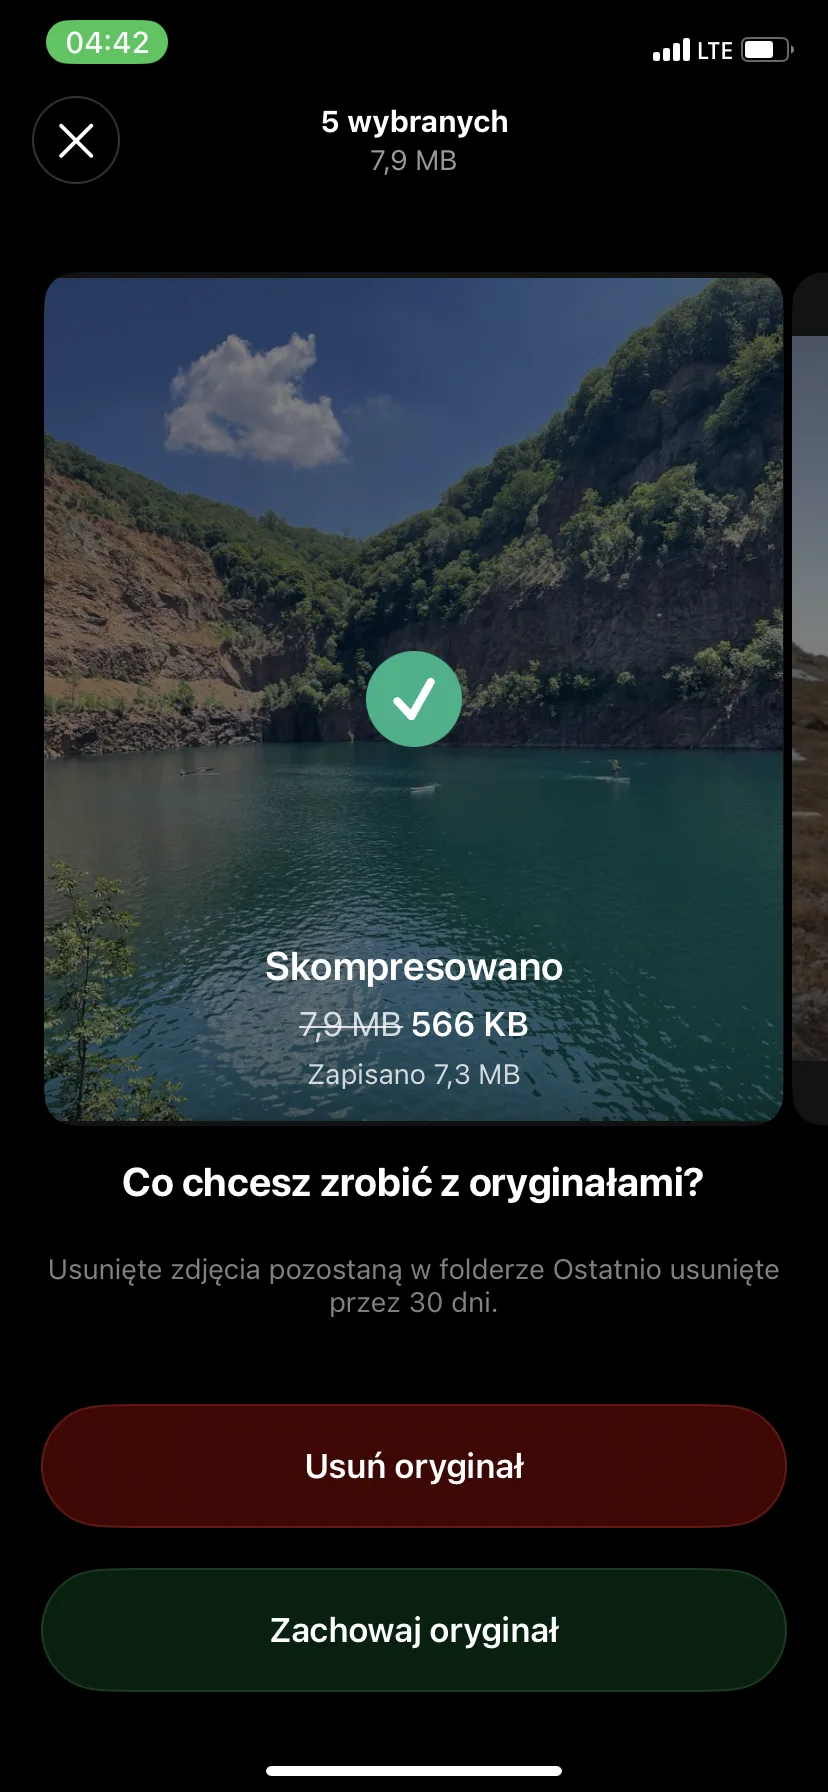
- During the first attempt, select Keep Original to retain the original. Open the compressed copies in the Photos app and compare them with the originals before deciding to delete anything. Keeping both versions initially takes up extra space. Deleted originals remain in the Recently Deleted album for up to 30 days.
For photos intended for sending or viewing on a phone, try Medium compression. If you plan to edit or print them, start with Optimized and check if the details are still clear.
Method 2: Use an online photo compression tool
If you don’t want to install an app, you can use an online photo compression tool. One option is TinyPNG: it reduces image files and can also convert them to another format.
You upload the photos, wait for the service to compress them, and then download the smaller copies. It’s a convenient solution for occasional file uploads, as long as you don’t mind sending your images to an online service.
- Open TinyPNG in Safari and tap the file upload area.
- Select a photo from the Photos or Files app. Wait for the compression to finish.
- If you need a different format, enable Convert my images automatically and choose a format supported by the destination. Otherwise, leave conversion off. The exception is uploaded HEIC files: TinyPNG converts them to JPEG.
- Download the result, find it in the Files app, and check its size before uploading it further.
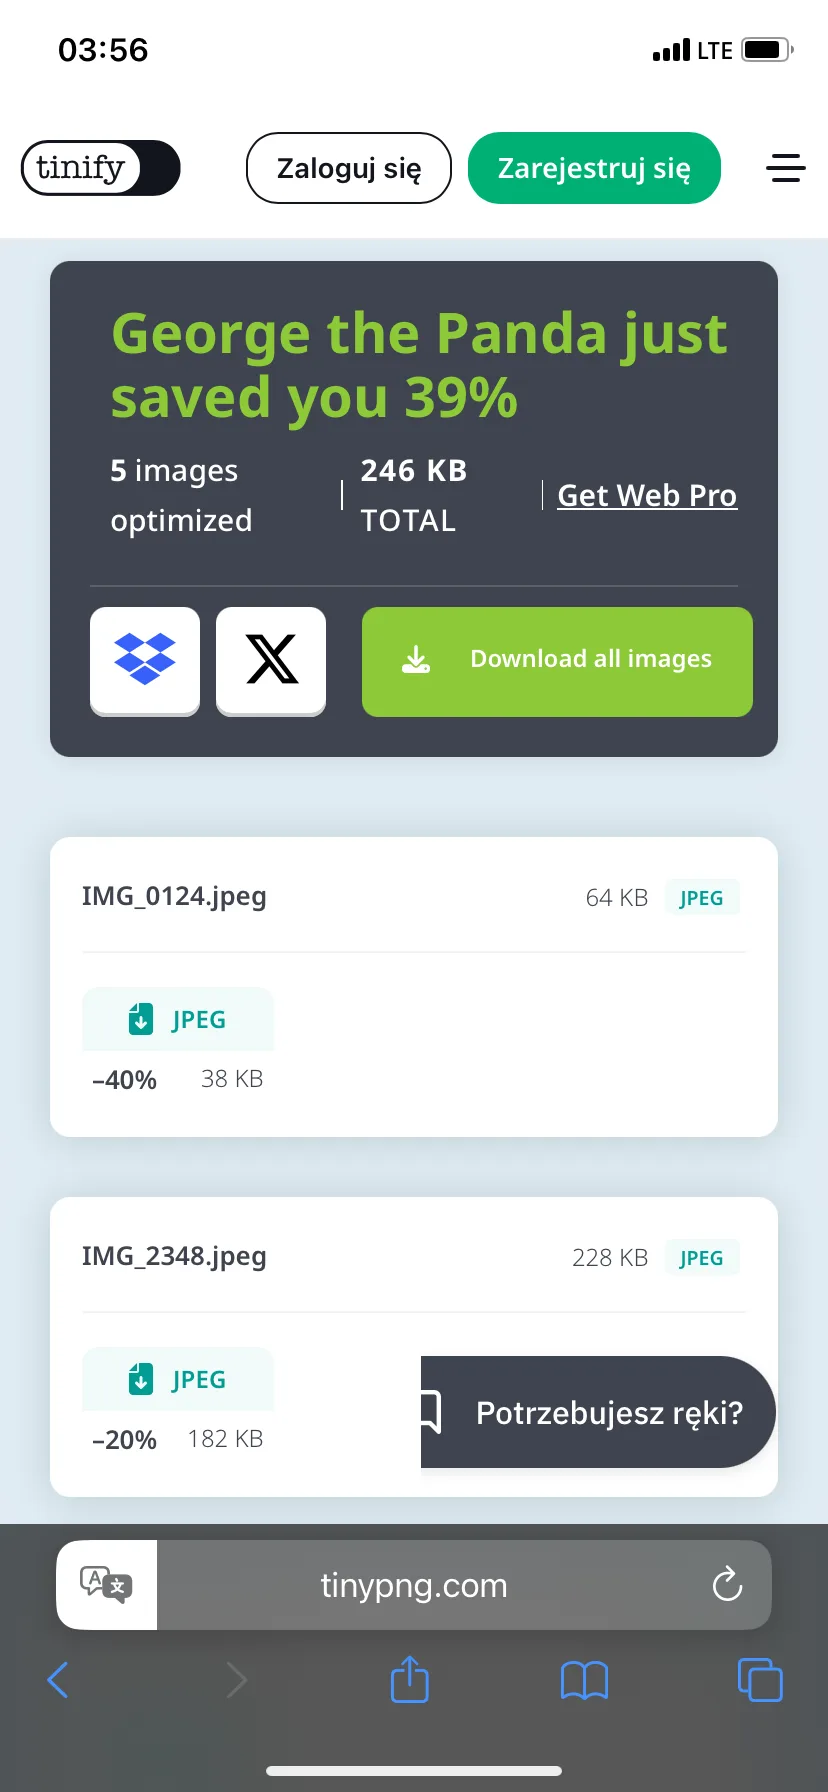
TinyPNG processes uploaded images on its servers. For private documents or photos that you prefer to keep on your phone, use Clever Cleaner, the Files app, or Shortcuts instead.
Method 3: Change the format and size of the photo in the Files app
To get a smaller photo without installing another app and uploading it to a website, try the built-in Files app on your iPhone. Its Convert Image feature creates a separate copy of the image and allows you to choose a smaller size.
You can keep the current photo format or change it if necessary — for example, to JPEG for a site that does not accept HEIC. The original remains unchanged.
- In the Photos app, select the image and tap the share button — Share.
- Select Save to Files to save it in the Files app, and specify the folder.
- Open Files, find the saved image, then touch and hold it.
- Select Quick Actions > Convert Image from the quick actions menu.
- Select JPEG, PNG, or HEIF. You can stick with the current format: for example, for a JPEG image, select JPEG again.
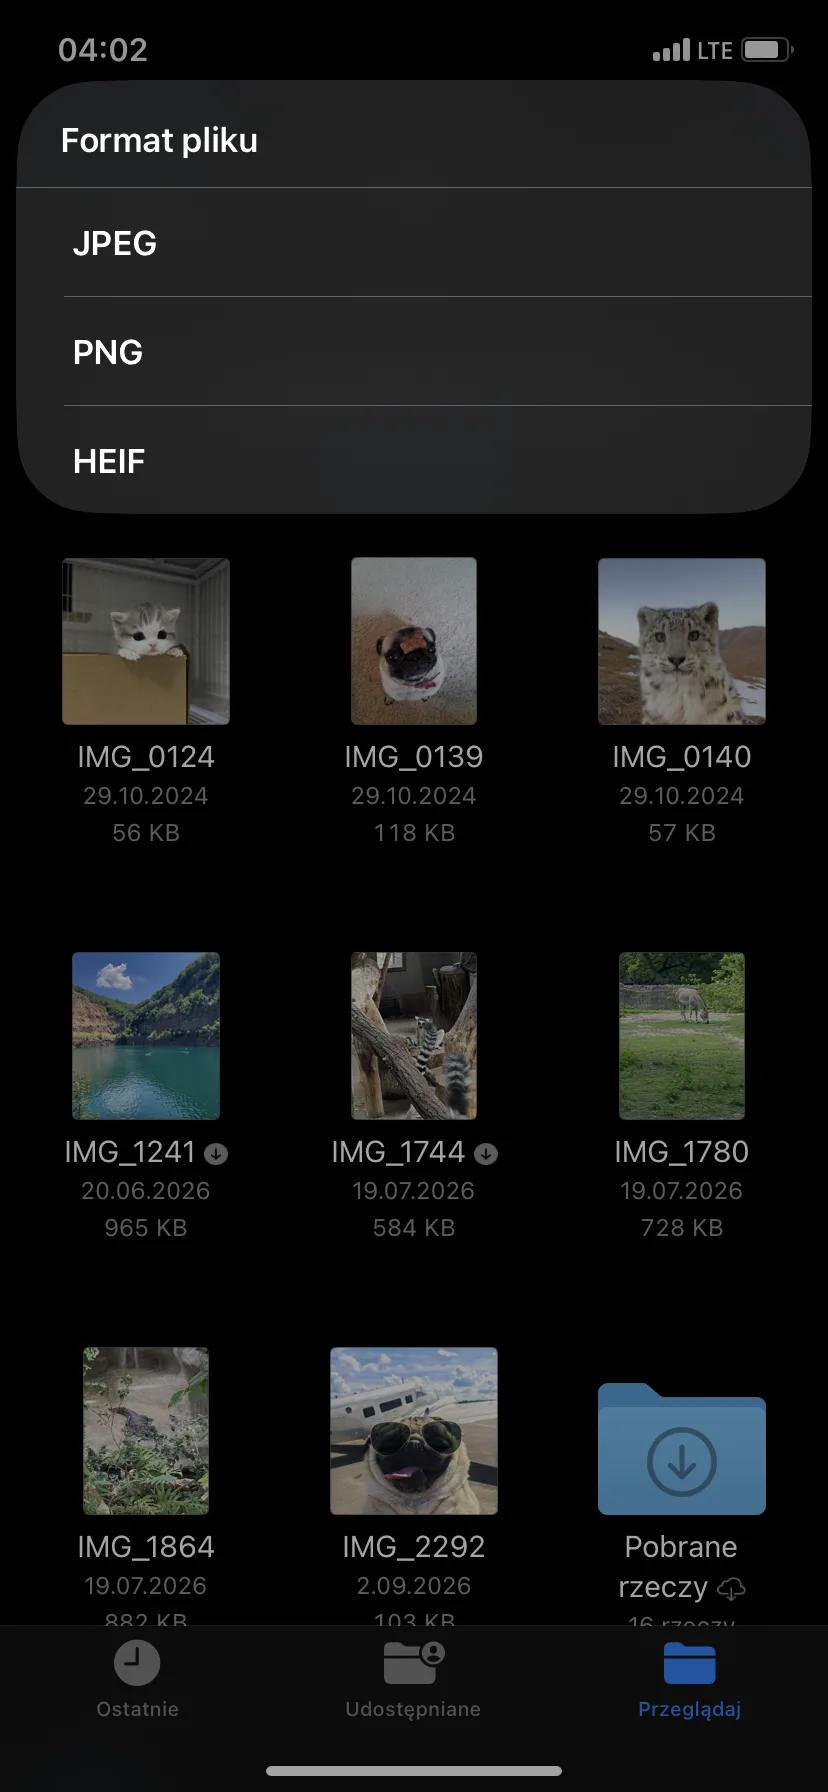
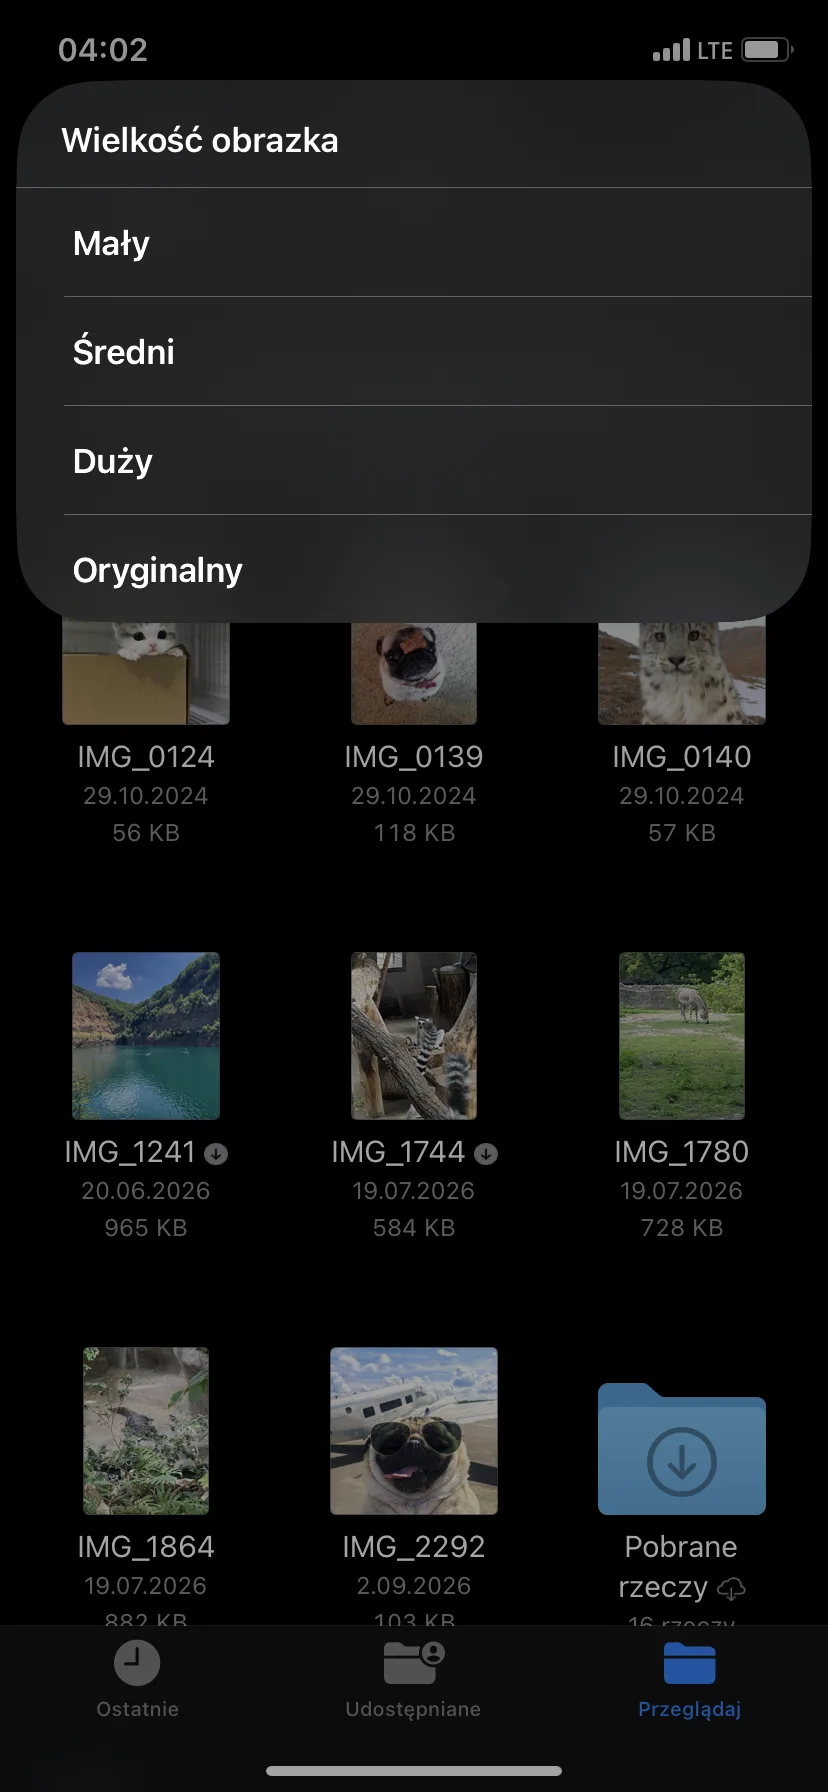
- In the Image Size menu, select Small, Medium, or Large. The Original option keeps the original dimensions, so if you want to reduce the photo, choose one of the smaller available sizes.
- Otwórz nowy plik i sprawdź jego rozmiar za pomocą Uzyskaj informacje. Jeśli nadal przekracza limit przesyłania, wróć do oryginału i wybierz mniejszy rozmiar.
Jaki format wybrać? W przypadku zdjęć JPEG jest bezpiecznym wyborem, gdy liczy się zgodność z różnymi urządzeniami i usługami. HEIF zwykle zajmuje mniej miejsca przy podobnej jakości obrazu, ale starsza aplikacja lub strona może go nie otworzyć. PNG sprawdza się w grafikach interfejsu i obrazach wymagających przezroczystości. Rzadko jest jednak najmniejszym formatem dla zdjęcia z aparatu.
Metoda 4: Jak zmienić rozmiar zdjęcia za pomocą skrótu wielokrotnego użytku
Jeśli często potrzebujesz zdjęć o tej samej szerokości, aplikacja Skróty może zaoszczędzić ci czas. Wystarczy raz przygotować skrót zmieniający rozmiar i uruchamiać go ponownie podczas przygotowywania zdjęć na blog, do ogłoszenia lub formularza przesyłania.
Samodzielnie wybierasz szerokość w pikselach, a wysokość dopasowuje się automatycznie, aby zachować proporcje zdjęcia. Zmniejszenie wymiarów obrazu zazwyczaj zmniejsza również rozmiar pliku.
- Open the Shortcuts app and tap the plus button.
- Add the Select Photos action to choose photos. Enable Select Multiple if you sometimes want to process several photos at once.
- Add Resize and enter the required width. Leave the height to be automatically determined to maintain the photo’s proportions.
- Add Save to Photo Album or Save File — depending on where you want to save the result.
- Give the shortcut a descriptive name, such as “Resize Photos for Upload.”
- Run it once on a test photo.
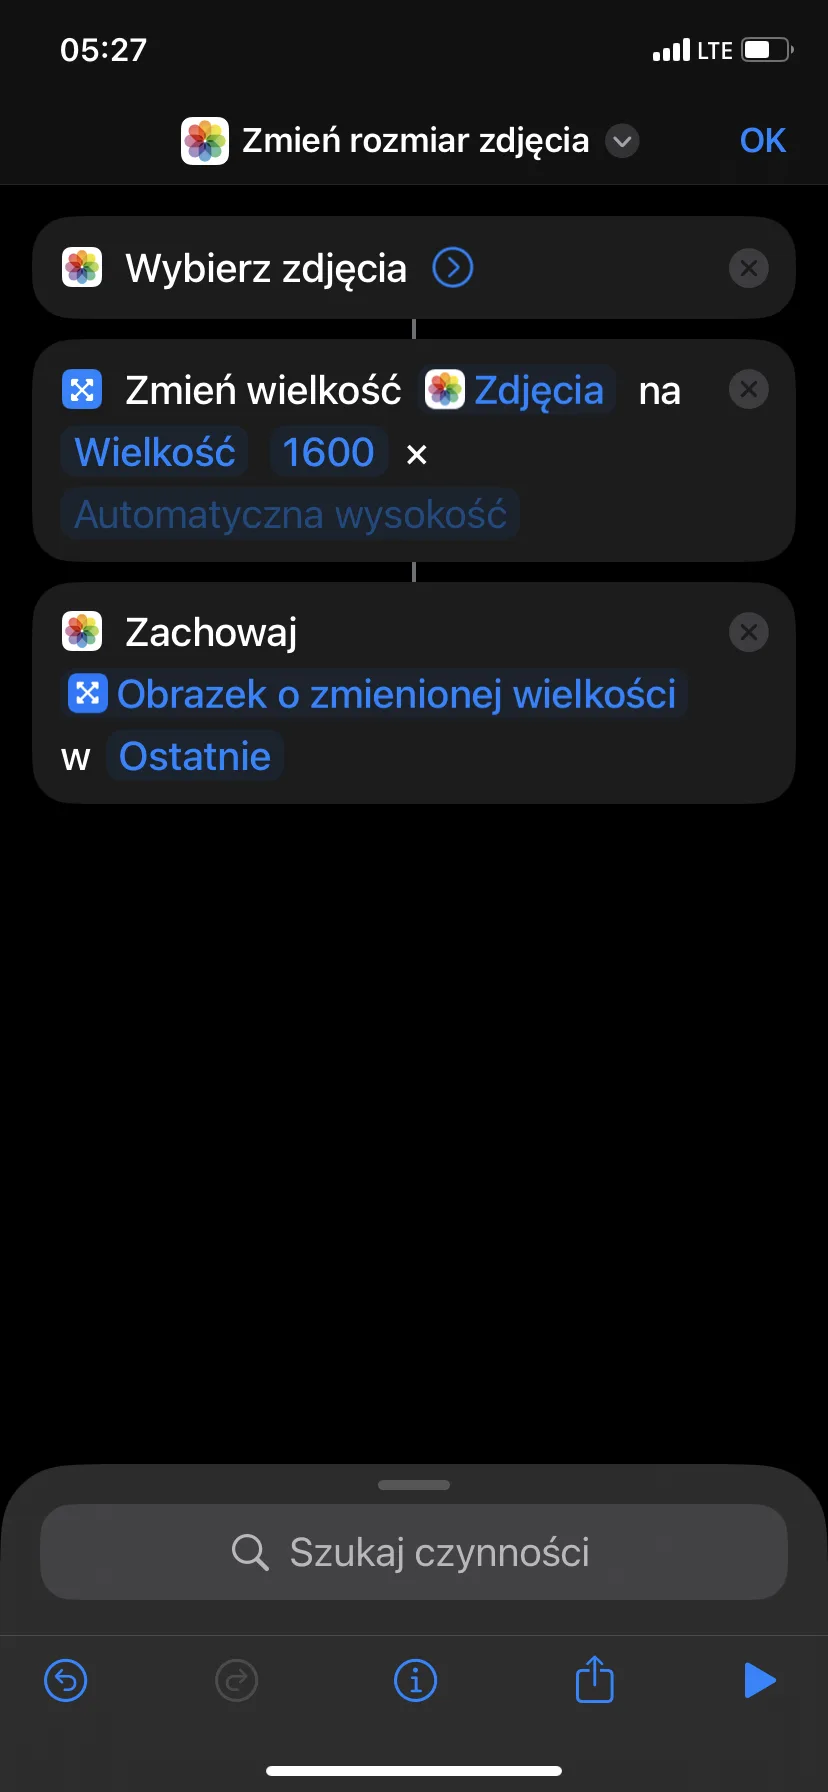
Saving in the Files app is convenient when the page opens a file selection window. Saving in Photos places the result in the library along with other images. In both cases, make sure the shortcut creates a new copy before you use it on important photos.
What width to choose? For many screen applications, a reasonable starting point is 1600–2000 pixels, but this is not a fixed rule. If the destination specifies required dimensions, follow those.
The Resize Image action does not require a separate format change step. Add Convert Image only if the destination requires a specific format, such as JPEG. If the file is still too large after resizing, go back to the original and try a smaller width.
Method 5: Send a Smaller Copy via Email
If you only need to send a smaller photo via email, the Email app can prepare a reduced attachment, leaving the original unchanged in the Photos app.
- Open the Photos app and select the image.
- Tap Share, the sharing button, and then select Mail.
- Add the recipient and tap Send to send the message.
- If Mail displays a size menu, compare the expected values next to the options Small, Medium, Large, and Original.
- Tap the smaller size in which you want to send the photo.
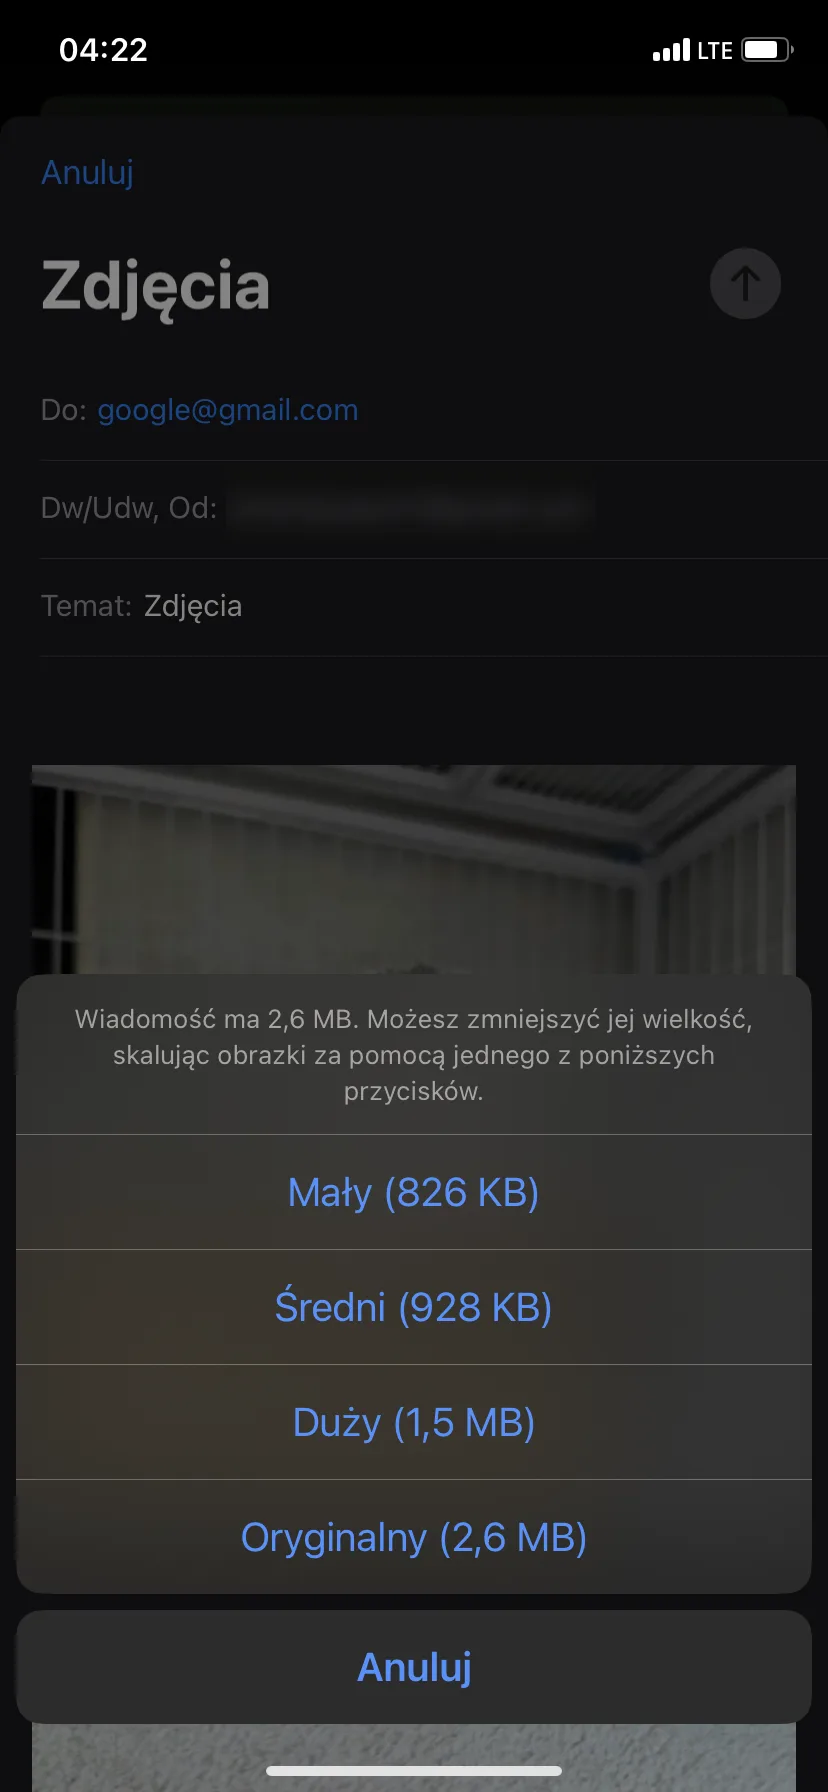
Average is a reasonable first choice for regular viewing on screen. Large retains more detail, while Small is suitable for a thumbnail when quality is less important. If the image contains fine text or may be printed, send a sample to yourself before choosing the smallest version.
How to make new photos on iPhone take up less space
You can limit the space taken up by future photos: open Settings > Camera > Formats and select High Efficiency. Supported photos will then be saved in HEIF, usually with the .heic extension, instead of JPEG. At comparable image quality, this format generally requires less space.
The Most Compatible option saves JPEG photos and is useful when other software cannot open HEIC. However, you don’t need to use it for every photo: leave High Efficiency and convert individual images when the form requires JPEG. This setting applies to new photos, not images already saved in the library.
On models supporting Apple ProRAW, keep RAW capture turned off unless you need more freedom during editing. Live Photos is a separate feature in the Camera app. Turn it off there before taking a photo if you don’t need motion and sound.
Which method to choose?
- Clever Cleaner is a practical starting point when you have several photos to reduce: you can select the entire group and compare compression settings in one place.
- If you don’t want to install an app and don’t mind uploading photos to an online service, another option is an online compressor like TinyPNG.
- To get a smaller copy without a new app and online service, use the Files app.
- Select Shortcuts when the destination requires a specific width in pixels or you want to regularly repeat the same resizing.
- Email is useful when you just want to send a smaller attachment and leave the original unchanged.
Regardless of the method chosen, check if the saved file fits within the limit at the destination. The level of compression or width in pixels does not guarantee a specific number of megabytes.
Frequently Asked Questions
How to reduce file size on iPhone to fit a photo within a specific MB limit?
Check the initial size, then choose a smaller variant in the Files app, reduce the width using Shortcuts, or try an online compressor. Check the saved result: if it’s still too large, go back to the original and choose a smaller size.
No single dimensions guarantee a file size of 1 MB or 2 MB. Fine details and image noise can increase file size even with the same dimensions. Make one or two reasonable changes instead of repeatedly compressing the same copy.
How to reduce a photo on iPhone without installing an app?
You can do this in the Files app by creating a smaller copy, or in Shortcuts by setting a repeatable width in pixels. Mail is another option when you only need a smaller attachment for an email.
You can also open an online compressor in Safari, such as TinyPNG. Before using it for private photos, check the upload limits and how the service processes your images.
Does reducing the size of a photo lower its quality?
Generally yes, although the change may be imperceptible during regular viewing. Reducing dimensions removes pixels, and stronger JPEG or HEIF compression discards more information. Enlarging the image, heavy cropping, and large prints make it easier to notice this loss.
“Good quality” depends on the purpose of the photo. A copy may be perfectly suitable for an email while being too small for a photo book. Keep the original until you are sure the reduced version meets its purpose.
Does the Optimize iPhone Storage feature reduce the actual size of the photo?
No. When iCloud Photos and the Optimize iPhone Storage option are enabled, Apple stores the originals in full resolution in iCloud, while keeping smaller copies on the iPhone to save space. This frees up local storage on the device but does not create a permanently compressed original or reduce the space occupied in iCloud.
Use memory optimization when your phone starts running out of space. If you really need a smaller file to send or upload to the site, choose one of the methods described above.
Legg att eit svar